Import your trades
Bring your trades into HANSEI from a CSV file.
This page shows how to bring your trades into HANSEI. You download a file of your trades from your broker. Then you import it into HANSEI. A broker is the company you buy and sell through.
Before your first import
Do these steps once, before your first import. They help your trades come in right.
Set your timezone
HANSEI starts with the timezone UTC, a world time standard. Files from brokers often show times without a timezone. HANSEI reads those times in your timezone. So set it before you import.
- At the bottom of HANSEI's menu, click your name.
- Click My Profile.
- Under Profile Information, open Timezone.
- Pick the timezone of the times in your file. For New York time, pick Eastern Time (ET).
- Click Update Profile.
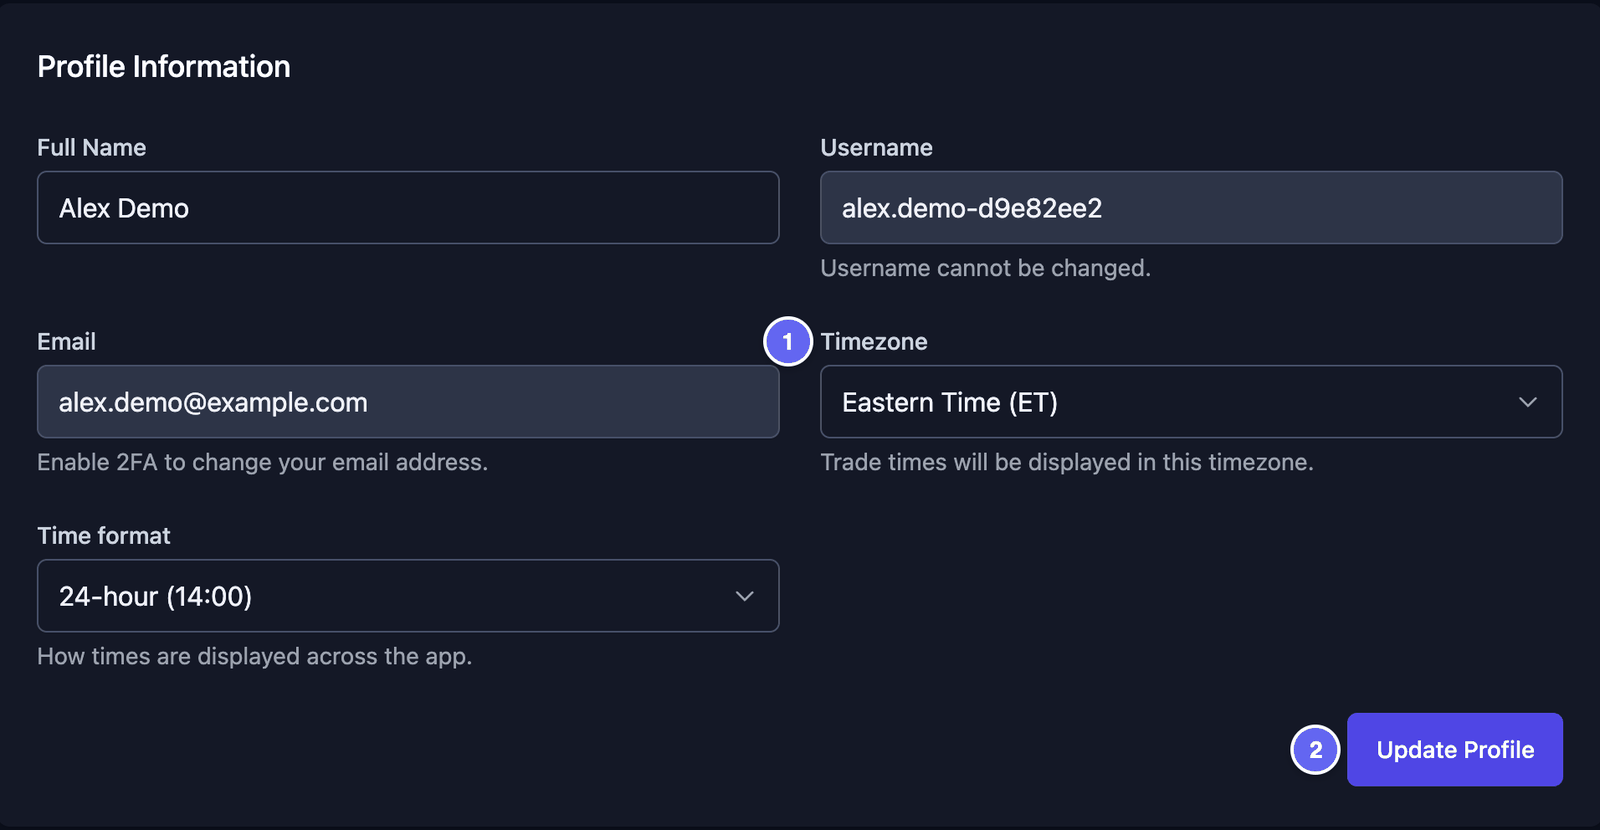

Changing the timezone later doesn't fix trades you already imported.
Add your account
Here, an account is your account at a broker. Adding it is optional, but it helps. HANSEI can then keep the trades of each account apart.
- At the top of HANSEI's menu, click All Accounts.
- Click Manage Accounts.
- Fill in the form, then click Add Account.
Accounts and cash explains each box of the form.
Does your broker's file name your account? Then an import can also add the account for you.
Turn off trade grouping for round-trip files
A round trip is one complete trade: the buy and the sell together. Many files have one row for each round trip.
Trade grouping is on when you start. It joins trades of the same stock and the same direction. Both are long (you bought first) or both are short (you sold first). If they start within 60 minutes of each other, they become one trade.
In a round-trip file, that merges trades you made separately. Your journal then shows fewer trades than you made. So turn grouping off before you import a round-trip file:
- At the bottom of HANSEI's menu, click your name, then Settings.
- Click the Trading tab.
- Find Trade Import Settings. Untick Enable Trade Grouping.
- Click Update Import Settings.
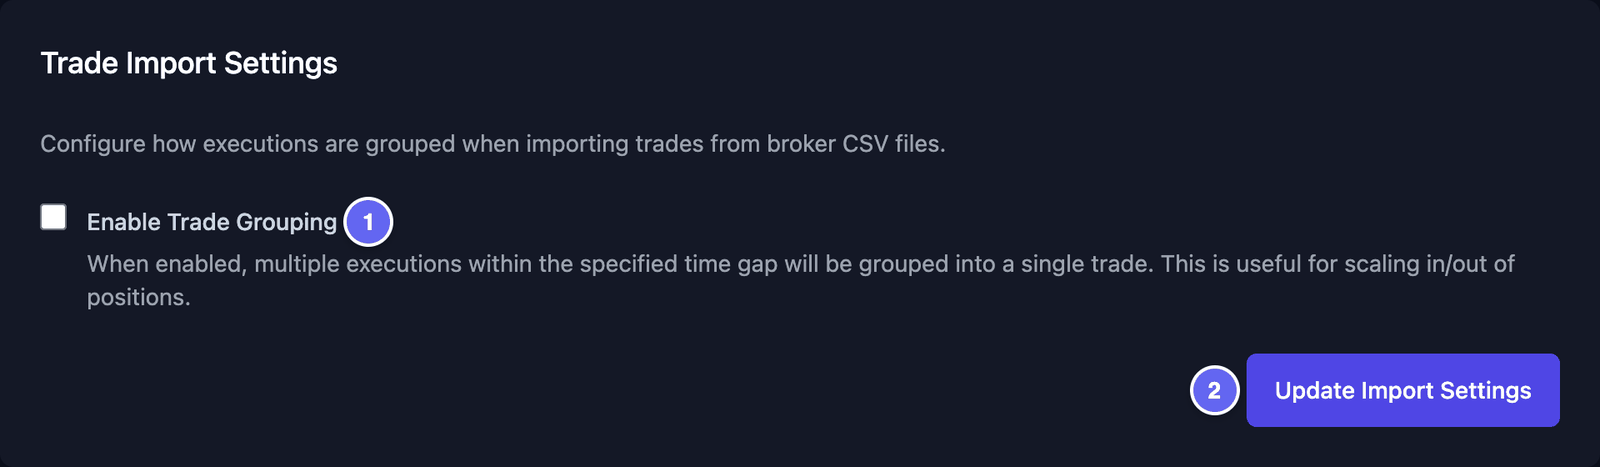

The change only affects future imports. Trades already in your journal stay as they are.
Get a file from your broker
Most brokers let you download your trades as a CSV file. CSV is a simple table file. Each line is one row, and commas split the row into cells.
- Sign in on your broker's website.
- Find your trade history. It may be called history, activity or trades.
- Choose the dates you want and download the list as CSV.
Download your trade history. An account summary or a list of positions has no trades in it.
HANSEI's Auto-Detect recognises the files of many brokers. You can also pick your broker in the Broker Format list. It has Lightspeed Trader, Charles Schwab, ThinkorSwim, Interactive Brokers, CapTrader, Webull, E*TRADE, Firstrade (Alpha), PaperMoney, TraderVue, TradingView, AvaTrade, Tradovate, Sierra Chart, NinjaTrader, Questrade, TradeStation and Tastytrade.
HANSEI reads CSV and TXT files, and Sierra Chart DATA files, up to 50 MB. It can't read PDF or Excel files. Have an Excel file? Open it in Excel and save it as CSV.
The simple file format
Is your broker not in the list? Then make a simple file yourself, for example in a spreadsheet app. Use one row for each complete trade (each round trip).
The first row holds the column names. Use these names:
| Symbol | Side | Quantity | Entry Time | Entry Price | Exit Time | Exit Price | Commission |
|---|---|---|---|---|---|---|---|
| AAPL | long | 50 | 2026-10-01 09:42:00 | 226.10 | 2026-10-01 10:15:00 | 228.35 | 1.00 |
| MSFT | long | 20 | 2026-10-01 10:05:00 | 418.20 | 2026-10-01 11:30:00 | 415.90 | 1.00 |
| NVDA | short | 40 | 2026-10-02 09:50:00 | 128.40 | 2026-10-02 10:25:00 | 126.10 | 1.00 |
The trades and numbers are an example.
- Symbol — the stock's short name, like
AAPLforNASDAQ:AAPL. - Side —
longorshort. Long means you bought first and sold later. Short means you sold first and bought back later. Without a Side column, every row counts as long. - Quantity — how many shares you traded.
- Entry Time and Entry Price — when you got in, and at what price.
- Exit Time and Exit Price — when you got out, and at what price.
- Commission — the fee your broker charged for the trade.
HANSEI needs at least a symbol, a date and time, a price and a quantity. The other columns make your journal more complete.
Write dates and times like 2026-10-01 09:42:00. That is year, month and day, then hours, minutes and seconds, on a 24-hour clock. HANSEI reads these times in your timezone.
Save the file as CSV. In the file, each row is one line, with commas between the cells:
AAPL,long,50,2026-10-01 09:42:00,226.10,2026-10-01 10:15:00,228.35,1.00
When you import it, keep Auto-Detect (Recommended) or pick Generic CSV in Broker Format.
Import your trades
- In the menu, click Import, then CSV Import. The Import Trades page opens.
- Click Browse files and choose your file. Or drag the file onto the box. Its name shows under the box.
- In Broker Format, keep Auto-Detect (Recommended).
- In Trading Account, keep Automatically detect from file, or pick your account. This box only shows once you have an account.
- In Strategy handling, keep Automatically classify. HANSEI then labels each trade by how long you held it.
- Tick Import notes and descriptions only if your file has a notes column.
- Look at the Pre-import check box. Format check should say Recognized.
- Click the Import button. It shows how many trades it found, for example Import ~24 Trades.
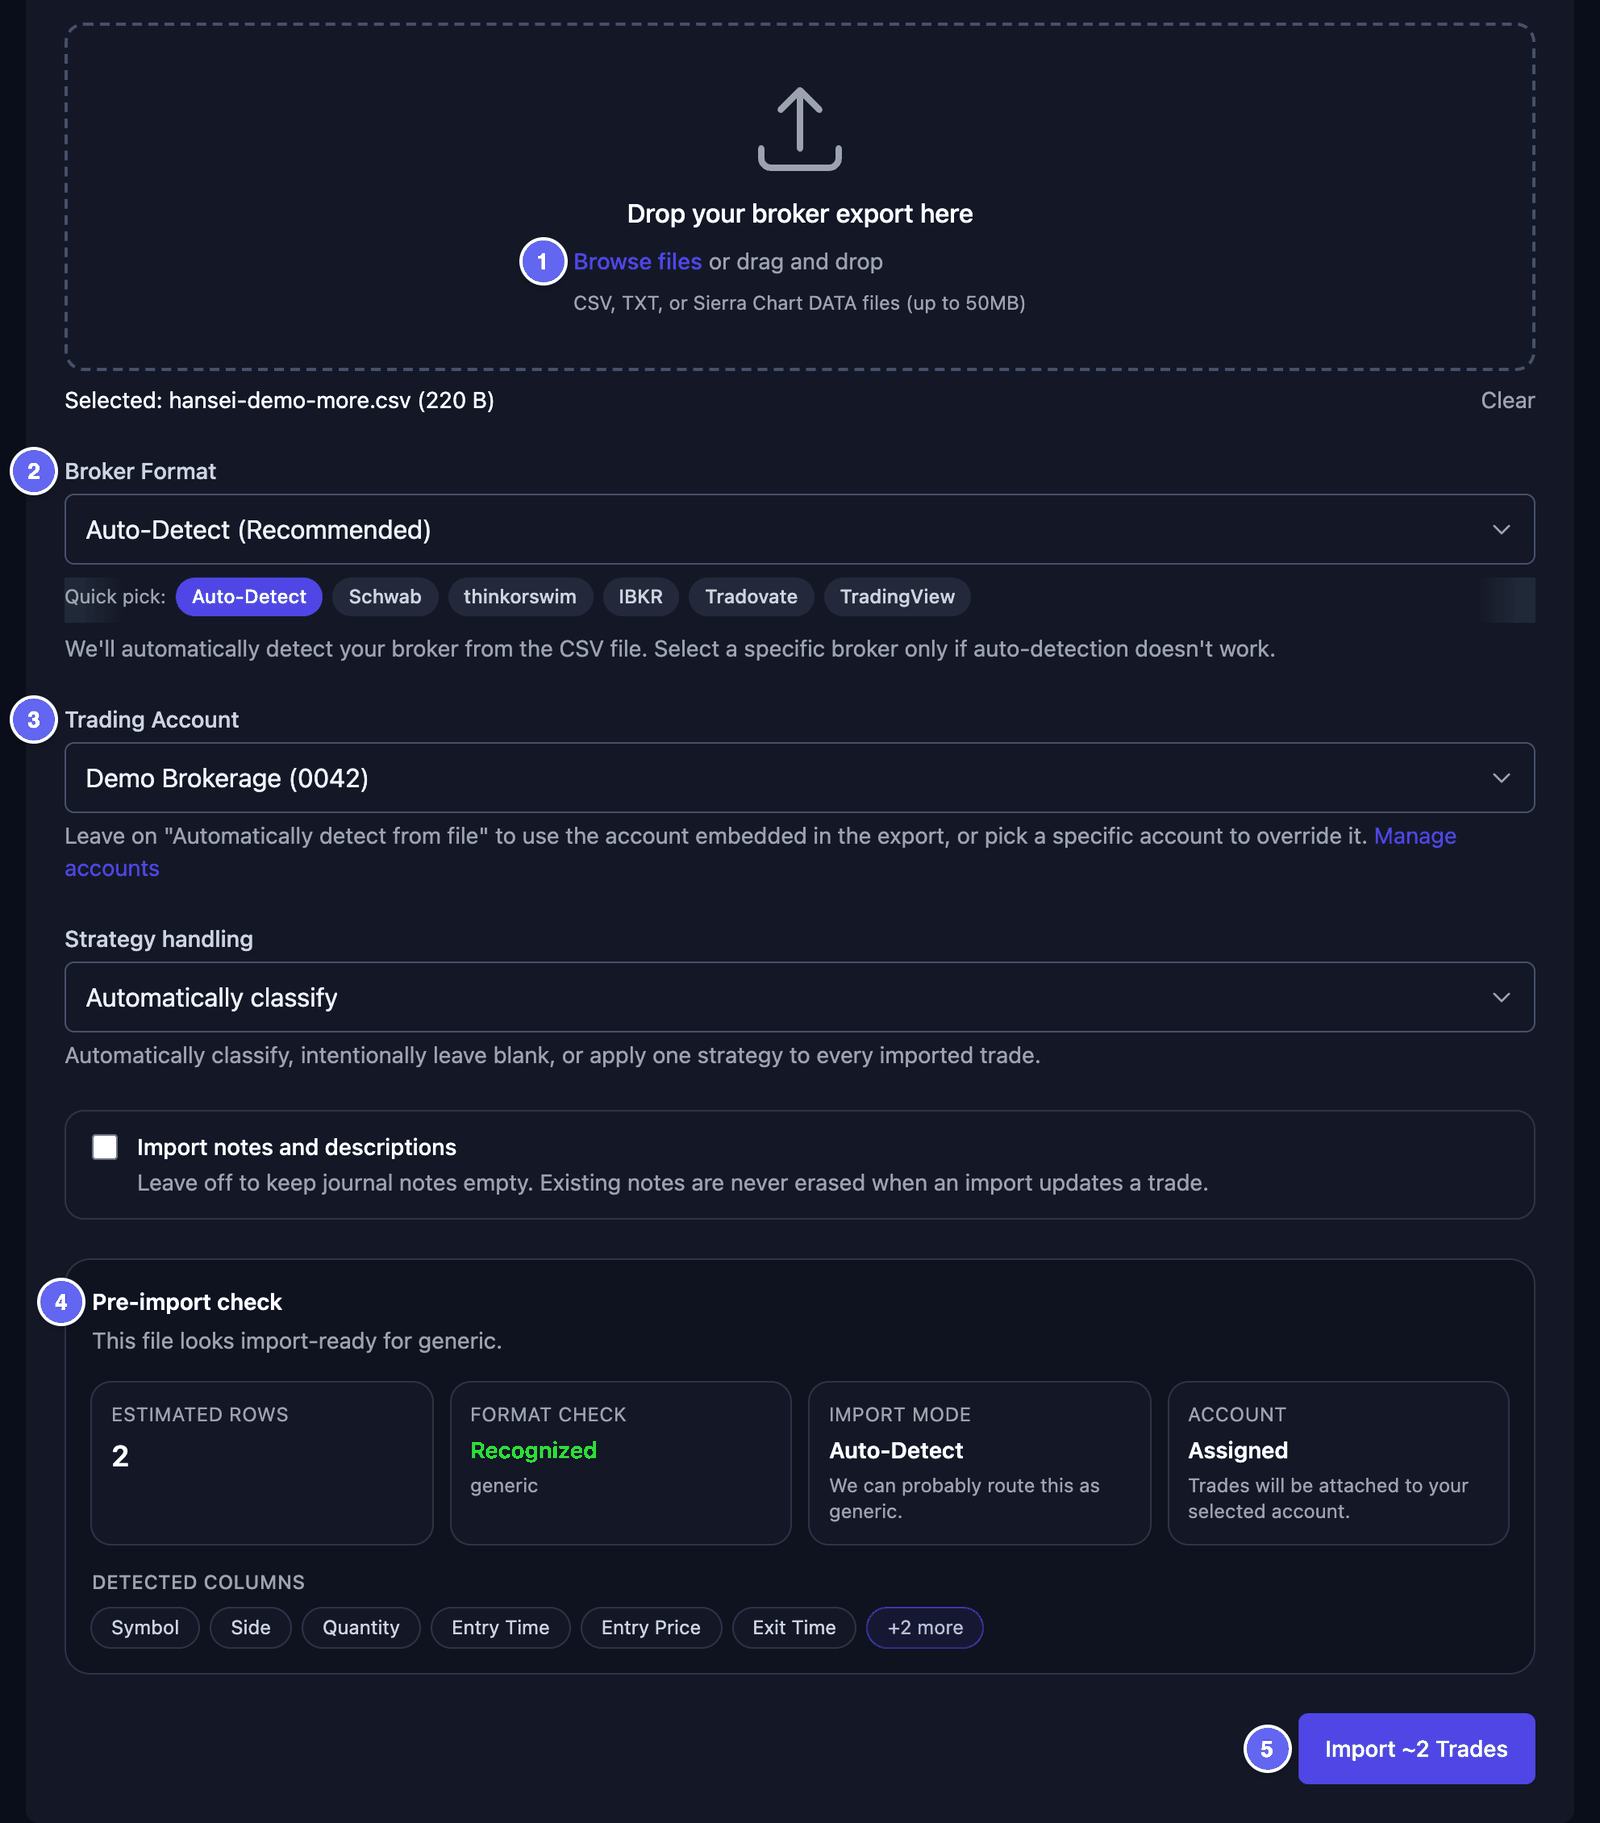

The import takes a moment. Then a window shows the result.
Check the result
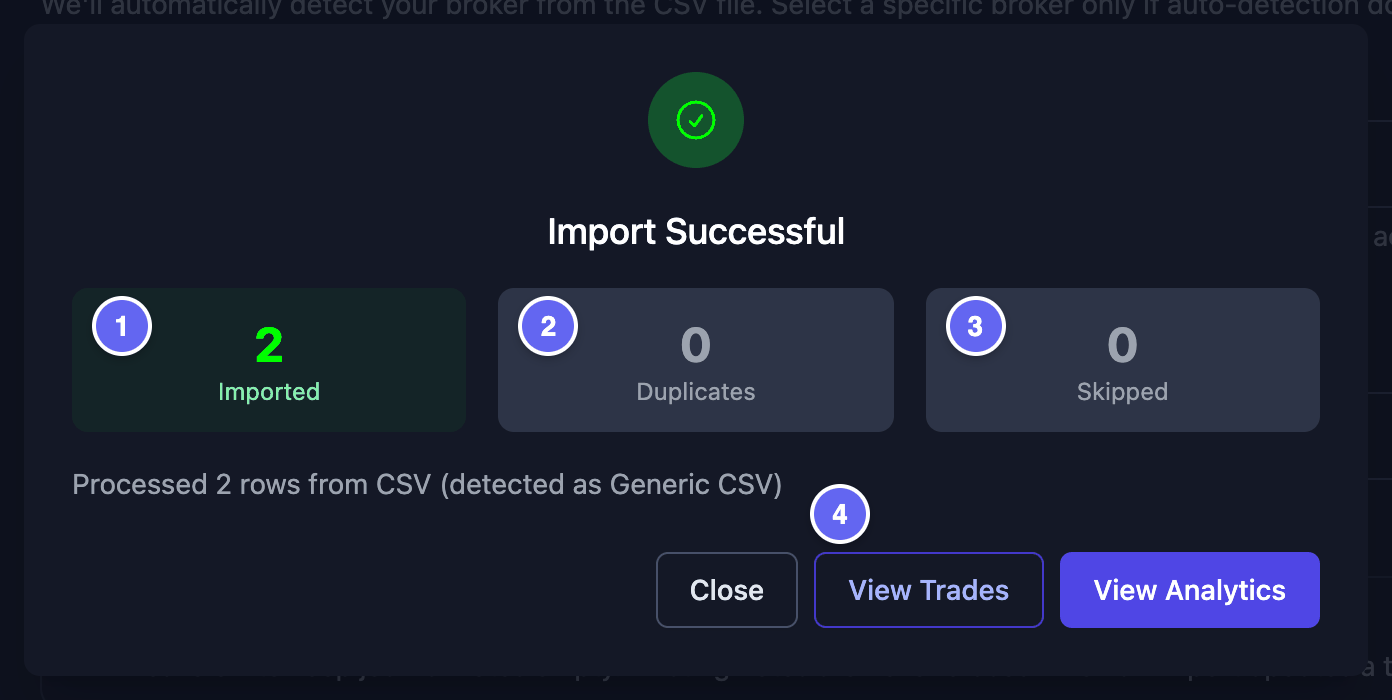
When the import ends, a window shows what happened. Import Successful means it worked.
- Imported — the trades HANSEI added to your journal.
- Duplicates — trades already in your journal. HANSEI doesn't add a trade twice. The same stock with the same start time counts as the same trade.
- Skipped — rows HANSEI couldn't read. Click View skipped row details to see which rows, and why.
A yellow Warnings list may also show. It tells you what HANSEI noticed in your file.
Click View Trades to see the trades from this import. Or click Close.

Undo an import
Imported the wrong file, or with the wrong settings? You can remove the whole import.
- In the menu, click Import, then CSV Import.
- Scroll down to Import History. Each import shows its file name, date and time.
- Click Delete next to the import.
- In the window that opens, click Delete again.
HANSEI removes that import and the trades it added. You can't undo this.
Then fix the file or the setting, and import the file again.


If something goes wrong
- No Trades Imported. HANSEI found no new trades. Does Duplicates show a number? Then those trades are already in your journal. If not, check that the file is your trade history. Check the column names against the simple file format.
- A window asks you to match your columns. It is called Match your CSV columns. HANSEI didn't recognise your column names. For each column, pick what it holds. You must match Symbol, Quantity and Entry Price. Match your date column too. Then click Save mapping & import.
- The times are wrong. Your timezone wasn't set. Set your timezone, undo the import, then import again.
- Separate trades became one. Trade grouping was on. Turn it off, undo the import, then import again.
- Your file is from a different broker. Pick that broker in Broker Format, then import again. If a window says Broker Format Mismatch, click the button that ends in (Recommended).
- Still stuck? Read Help and questions, or contact support in GENKAN.